How to use Confetti Effects features of Sky Addons for WordPress
Sky Addons Confetti Effects extensions adds festive and engaging particle animations to your Elementor pages. Create eye-catching confetti celebrations that trigger on various actions like page load, element view, clicks, or hover events. With extensive customization options for particle behavior, colors, and shapes, you can design the perfect visual celebration for announcements, achievements, or special content sections.
Key Features
- Multiple preset effect types including Basic, Random, Fireworks, Snow, and School Pride
- Smart triggering options (page load, on view, on click, hover, AJAX success, Form Submit etc)
- Full customization of confetti behavior (count, angle, spread, velocity, decay, gravity)
- Custom color and shape options to match your brand or theme
- Works with all Elementor elements (widgets, sections, containers)
- Control positioning, z-index, and animation timing
Activate Confetti Effects Module
The Confetti Effects module comes pre-activated with Sky Elementor Addons Pro. To verify it’s active:
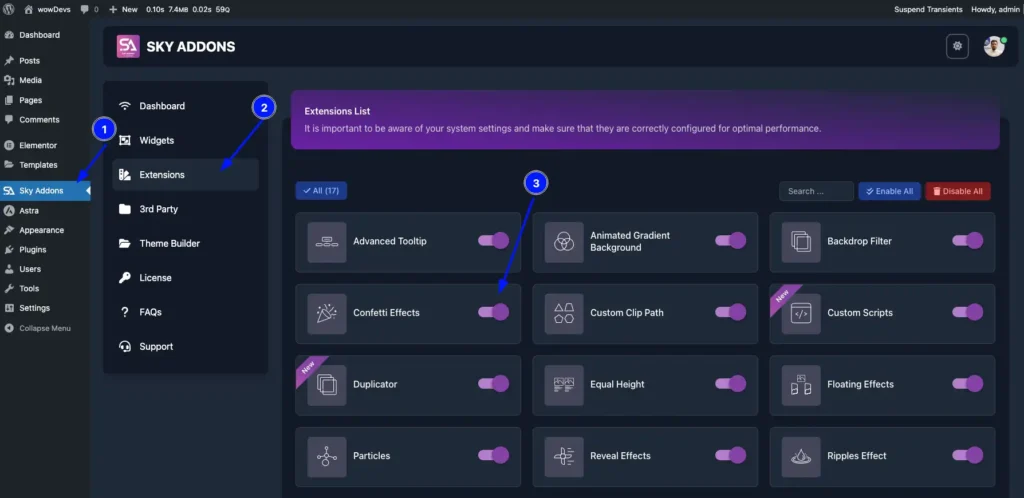
- Navigate to your WordPress Dashboard and locate “Sky Addons” in the left sidebar menu
- Click on the “Extensions” tab within the Sky Addons dashboard area
- Find the “Confetti Effects” option in the modules list
- Ensure the toggle switch is in the “On” position
- Save your changes if necessary
Apply Confetti Effects
- Open any page in Elementor Editor
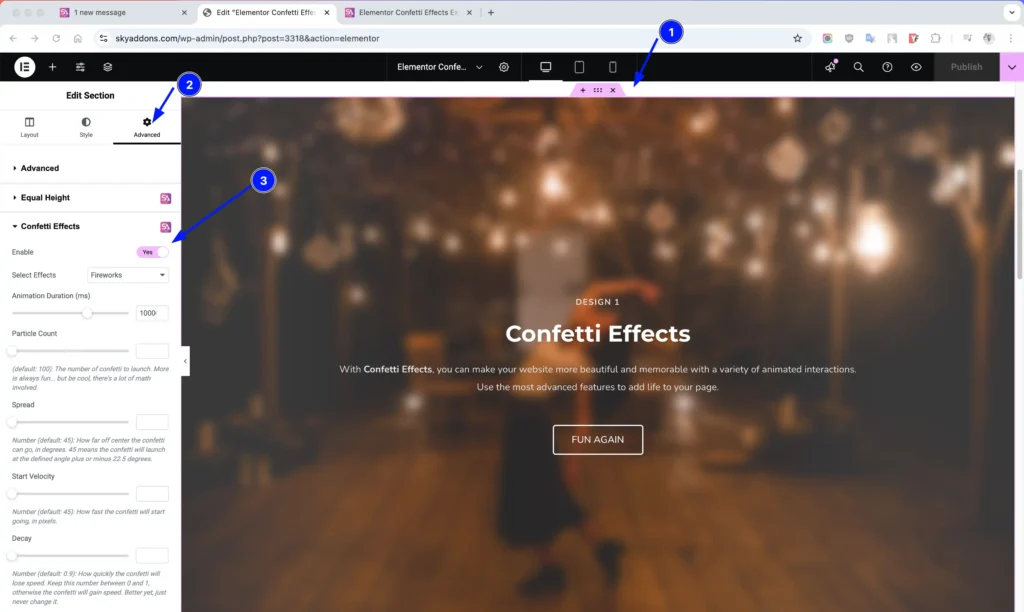
- Select a section, container, or widget where you want to apply the effect
- Go to the “Advanced” tab in the element’s settings panel
- Find “Confetti Effects” at the bottom of the advanced options
- Enable the effect by toggling the switch to “Yes”
Effect Types
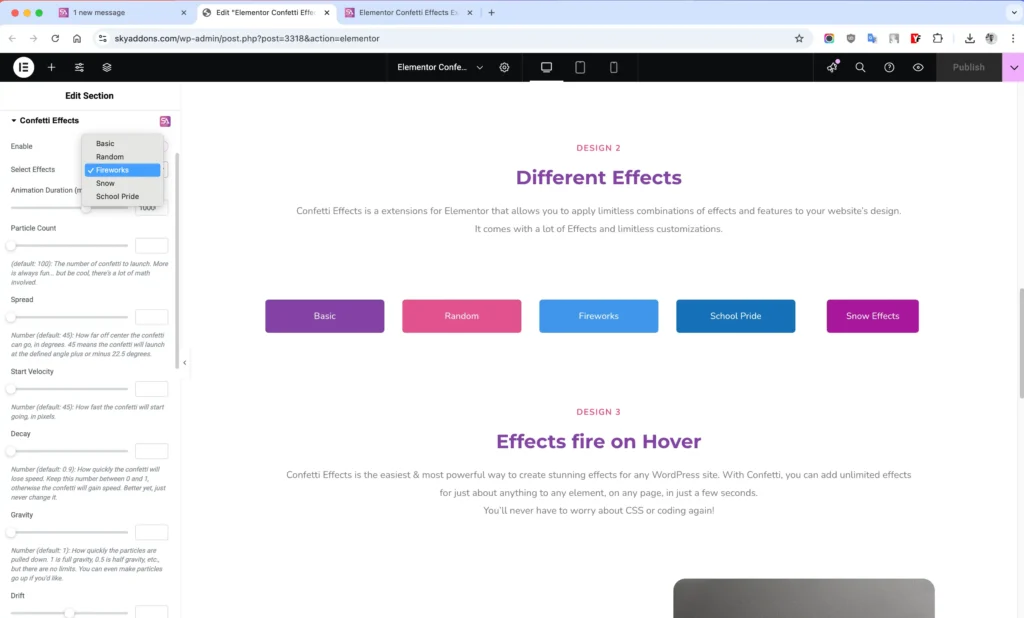
Choose from five different preset effects for your confetti:
- Basic – A simple confetti shower that drops from the top of the element, perfect for subtle celebrations or highlights.
- Random – Creates a more dynamic and unpredictable confetti pattern with particles launching in various directions and speeds. Great for creating energetic celebrations.
- Fireworks – Mimics fireworks explosions with confetti bursting outward from central points, ideal for big announcements or achievement celebrations.
- Snow – Generates a gentle downward drift of particles that resembles falling snow, perfect for seasonal themes or creating a calm, magical atmosphere.
- School Pride – A specialized effect that’s perfect for graduation announcements, school events, or sports celebrations with concentrated bursts of confetti.
Basic Configuration
Control the core behavior of your confetti effects with these essential settings:
- Enable – Turns the confetti effects on or off for the selected element
- Select Effects – Choose between Basic, Random, Fireworks, Snow, or School Pride presets
- Animation Duration – Set how long the effect animation runs (in milliseconds)
- Particle Count – Control how many confetti particles appear (more particles = more festive but can impact performance)
- Smart Trigger – Determine when the effect activates (page load, element in view, click, hover, or AJAX success)
Particle Behavior Settings
Fine-tune how your confetti moves and behaves:
- Angle – Direction in which confetti launches (90° = straight up)
- Spread – How wide the confetti disperses from the center point
- Start Velocity – Initial speed of the confetti particles
- Decay – How quickly particles lose momentum (0.1-1)
- Gravity – How strongly particles are pulled downward
- Drift – Horizontal movement bias (negative = left, positive = right)
- Origin – Define the X/Y coordinates where confetti originates
Appearance Customization
Adjust the visual aspects of your confetti:
- Colors – Enter custom colors as hex codes or color names (comma-separated)
- Shapes – Specify the mix of shapes (square, circle, star) to use
- Scalar – Size multiplier for all particles (smaller values = smaller confetti)
- Z-Index – Control whether confetti appears above or below other page elements
Trigger Settings
Configure when and how your confetti effect activates:
- Trigger Type – Choose between Page Load, Elements On View, On Click, On Mouse Hover, or Ajax Success
- Trigger Selector – For click/hover triggers, specify the CSS selector for the triggering element
- Delay Time – Set a delay before the confetti effect begins (in milliseconds)
Save and Preview
- Once you’ve customized and styled your confetti effects, click “Publish” or “Update” to save your changes.
- Preview the page to ensure the effects trigger and display as desired.
Troubleshooting
- Effects not showing: Ensure you’ve enabled the effect and saved/published your changes. Also check that JavaScript is enabled in your browser.
- Performance issues: If animations seem sluggish, try reducing the particle count or animation duration.
- Trigger not working: For click or hover triggers, verify your selector is correct. Use browser inspector to confirm your selector targets the right element.
- Z-index problems: If confetti appears behind content, increase the z-index value in the settings.
Conclusion
The Confetti Effects extensions provides a playful way to enhance user engagement and celebrate key moments on your website. With its extensive customization options, you can create subtle snow effects, explosive celebrations, or anything in between. Experiment with different settings to find the perfect combination for your specific use case.
If you have any questions or encounter any challenges while using, please don’t hesitate to reach out to our dedicated support team at http://wowdevslive.bdkoder/support/ where our expert team is ready to provide prompt and helpful assistance.